Wednesday, 19 April 2017
1001 ways to screw up beer
This blog, 1001 ways to screw up beer, is absolutely hilarious. I found it trying to look for some information about dividing hops. It's written with a wonderful dry sense of humor so just a shame it hasn't been updated for ... 5 years.

Sunday, 19 March 2017
Three day brewday
I love brewing, but it can take a long time. Fitting it around busy family life and a full time job is a huge challenge. After work and one the kids are in bed an all grain brew is a hopeless and foolhardy affair bound to finish in a rush way after midnight. Even on a weekend there's often not time.
In order to get the brew day done and balance it around everything else - I often resort to splitting the brew day over two or three days. This helps manage the time, and it seem to have little impact on the finished beer itself. The only perceptible impact I have noticed is that the beers tend to finish very dry. I put this down to leaving the wort overnight to cool - where i suppose the enzymes in the wort are continuing to eat away at the sugars and starches and convert these to fermentable sugars.
Here's what this looks like in practice:

 Day 1
Day 1
Water prep and mash - in this case it was a BIAB mash and at the end of the mash, after lautering, I ran the wort into a bucket (in fact this is the bucket i'll use again later for the fermentation later.) At the end of the mash i leave the bag on top of a colander inside the mash tun, cover this and let it drain out overnight.
Day 2

 Take a pre-boil gravity reading. Measure out hops and yeast nutrient. Start the kettle, and set alarms to warn me when the hops need to go in. Post boil empty into the fermenting bucket and check the temperature until it drops to whirlpool temp (77C in this case). Chuck in the whirlpool hops in a sanitised bag and pop a lid on. I leave this to cool overnight (between October and March this is very effective at bringing the temperature down).
Day 3
 Take another gravity reading to get the OG reading. Check the temperature is low enough to pitch the yeast (below 20C is my rule of thumb) - pitch the yeast and add an airlock. Then clear up. All done!

In order to get the brew day done and balance it around everything else - I often resort to splitting the brew day over two or three days. This helps manage the time, and it seem to have little impact on the finished beer itself. The only perceptible impact I have noticed is that the beers tend to finish very dry. I put this down to leaving the wort overnight to cool - where i suppose the enzymes in the wort are continuing to eat away at the sugars and starches and convert these to fermentable sugars.
Here's what this looks like in practice:

 Day 1
Day 1 Water prep and mash - in this case it was a BIAB mash and at the end of the mash, after lautering, I ran the wort into a bucket (in fact this is the bucket i'll use again later for the fermentation later.) At the end of the mash i leave the bag on top of a colander inside the mash tun, cover this and let it drain out overnight.
Day 2


 Take a pre-boil gravity reading. Measure out hops and yeast nutrient. Start the kettle, and set alarms to warn me when the hops need to go in. Post boil empty into the fermenting bucket and check the temperature until it drops to whirlpool temp (77C in this case). Chuck in the whirlpool hops in a sanitised bag and pop a lid on. I leave this to cool overnight (between October and March this is very effective at bringing the temperature down).
 Day 3
 Take another gravity reading to get the OG reading. Check the temperature is low enough to pitch the yeast (below 20C is my rule of thumb) - pitch the yeast and add an airlock. Then clear up. All done!


Sunday, 12 March 2017
Competition success - Belgian Tripel

 |
| My beer, bit flat in this pic |
This week I had more success - my Belgian Tripel placed third in the Tripels flight (15 beers in total) at the London Amateur Brewers "Fast like a Monk" competition and scored 41&38 from the judges, really pleased with these scores!
 |
| Comp entries |
I'm really pleased with this beer for a few reasons:
- Its my first excellent beer in a new style. My other excellent beers have both beer wheat beers.
- I used hops that I grew myself (First Gold) on my fence
- I put a huge amount of effort into making this a good beer, so I was really pleased when it paid off
There were a few things I could have improved to get a better score:
- It should have been stronger - at 7% I rather undercooked it for the style, at the limits of acceptability. I should have added a bit more sugar.
- It should have been better carbonated - I always take a safety first approach to carbonation in glass.
- It should have been hoppier - but again using my own hops was a bit of a gamble, there wasn't any data on their strength to help get the beer right. In future, as i like em hoppy, I'll over do the hops with my own and cross my fingers.....
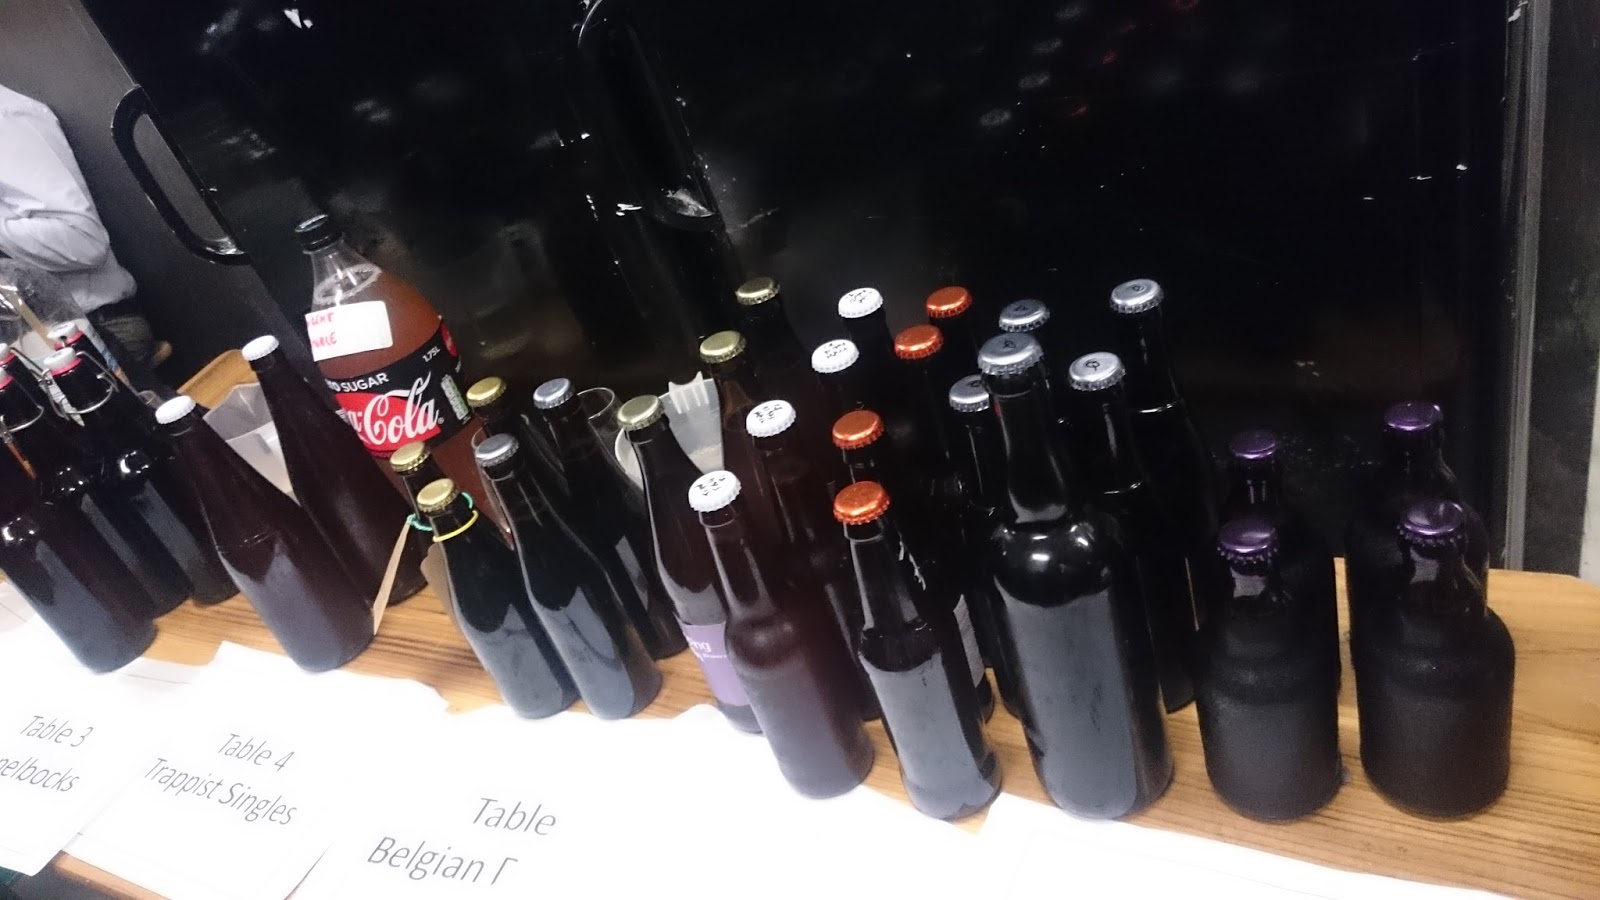 |
| My beers with the orange caps on the winners tasting table |
So a really enjoyable competition - but reckon results and awards nights on a Friday in future please (urgh!)
 |
| Getting my rosette with the other flight winners! |
Friday, 27 January 2017
Burn in the bag
These days I usually use the "brew in a bag" method to make my beer. It means doing a mash with the grains held in a large mesh bag. The key thing when doing this is to make sure that the bad doesn't touch the bottom of the boiler. In my case I've got an electric boiler, and the material catches and will burn. This is exactly what happened during my latest brew. It was just a little burn, and the wort does not seem to have any burnt taste or smell carried through into it, so fingers crossed the beer will still be good.

This is just a small hole, one I can fix with a needle and thread. It should be a reminder to me that i should take a bit more time setting up the mash before getting going.
Saturday, 24 December 2016
Winning Beer - Black Hefewiesse
I brewed my first winning beer. It was a Black Hefeweisse that I made for the London Amateur Brewers "Black Friday" competition. It scored 40/50 on the BJCP scoring system which classifies the beer as excellent.
A black hefeweisse, well if that sounds a bit odd, it is. Its not really a style, but the aim of the Black Friday competition is to make any type of beer you like as long as it is black. One of the best beers i tried at the 2015 competition was a black hefe so i thought I'd have a go at making my own.
My approach was to make a standard hefewiesse bier but with some roasted wheat malt (which has a very mild roasted malt flavour) to add the requisite blackness.
The beer didn't win the whole competition. But it did win it's flight. The flights are the subcatagories in the competition (eg Stout, Porter, Mild). My beer was put in the experimental beer flight, which was fair enough as the beer doesn't really fit in any of the existing styles.
When they announced the results I was completely surprised. But the judges loved the beer. They said it had a lovely big banana and clove aroma - BOOM that's the classic hefeweisse aroma! I think the key thing I did was to carry out a feurlic acid rest during the mash, which is supposed to really accentuate the clove/banana aroma. Worked a treat!
Black Hefeweisse 4.1%
11L Brew in a bag mash
Feurlic Acid rest at 45C for 20 mins
Mash at 67C for 60mins
Grain:
2.67kg Pale wheat malt
0.23kg
Hops:
4.5g Pheonix @FWH 60minutes (used this because it has a bit of a chocolate taste)
9g Pheonix @30 mins
4.5g Pheonix @FO
OG1051
FG1020
 |
| The winning black rosette |
A black hefeweisse, well if that sounds a bit odd, it is. Its not really a style, but the aim of the Black Friday competition is to make any type of beer you like as long as it is black. One of the best beers i tried at the 2015 competition was a black hefe so i thought I'd have a go at making my own.
My approach was to make a standard hefewiesse bier but with some roasted wheat malt (which has a very mild roasted malt flavour) to add the requisite blackness.
The beer didn't win the whole competition. But it did win it's flight. The flights are the subcatagories in the competition (eg Stout, Porter, Mild). My beer was put in the experimental beer flight, which was fair enough as the beer doesn't really fit in any of the existing styles.
When they announced the results I was completely surprised. But the judges loved the beer. They said it had a lovely big banana and clove aroma - BOOM that's the classic hefeweisse aroma! I think the key thing I did was to carry out a feurlic acid rest during the mash, which is supposed to really accentuate the clove/banana aroma. Worked a treat!
Black Hefeweisse 4.1%
11L Brew in a bag mash
Feurlic Acid rest at 45C for 20 mins
Mash at 67C for 60mins
Grain:
2.67kg Pale wheat malt
0.23kg
Hops:
4.5g Pheonix @FWH 60minutes (used this because it has a bit of a chocolate taste)
9g Pheonix @30 mins
4.5g Pheonix @FO
OG1051
FG1020
Saturday, 12 November 2016
Totally missing the target
Last night I brewed a beer and it all went wrong. I made a Belgian Blonde - target OG was 1049. Instead the OG came out at 1031 - disaster! What went wrong? I think it was the mash. I used my cool box mash tun, and put the grains into a BIAB mesh bag to help with cleanliness. However, last time i did this was with much more grain, whereas this time the sparge water bypassed a lot of the grain, or didn't extract as much as it could. And I was in a hurry..
So how can i rectify this? I've put the wort outside in the cold, and i'm going to attempt to boil off quite a bit of the wort to get it somewhere near to 1040 - 1045 and then i'll be adding some candi sugar to get it up to the right strength. Wish me luck!
UPDATE -
I did an extra boil of 2 hours, which got the wort to 1039. My savior was Wilkinson's which sells packets of dried malt. I added some DME to the wort to bring me up to 1045, which with the candi sugar later on is just enough for the style.
So how can i rectify this? I've put the wort outside in the cold, and i'm going to attempt to boil off quite a bit of the wort to get it somewhere near to 1040 - 1045 and then i'll be adding some candi sugar to get it up to the right strength. Wish me luck!
UPDATE -
I did an extra boil of 2 hours, which got the wort to 1039. My savior was Wilkinson's which sells packets of dried malt. I added some DME to the wort to bring me up to 1045, which with the candi sugar later on is just enough for the style.
Saturday, 22 October 2016
Homegrown (hops)

This year I've had my first decent crop of hops from my garden 300g of Cascade and First Gold. I’m really excited about turning these into a very fresh beer.
I've been growing hops in my garden for a few years now. Hops are perennial plants and take a year or so to establish which means the good crops don't come straight away. My First Gold plant is 3 years old, the Cascade is 2 years old.

Hops like the warmer end of the English climate, and lots of sun. I live in London and have a tiny garden, the hops grow on west and east facing fences. As much as possible I encourage the bines to trail up along trellising and other plants, which isn't optimal and they’s prefer full sun, but looks really good (which is half the point of growing them).
Knowing when to pick the hops is a bit tricky. When the hop flowers are ready depends on the type of plant and the location they are growing in. Commercially September is the peak hop picking time. But my hops weren’t ready that early, in fact mine were only really ready at the end of September.

How do you know when the hops are ready to pick? When they are too young they are wet feeling, perfectly green and when you press them in your fingers they stay compressed for a bit. When they are ready to pick there are some good signs:
- They feel dry and papery
- The tips of some of the leaves go brown
- When compressed the hops spring back to shape quickly
- When you rub the hops in your fingers you get a big hop aroma and the cone disintegrates quickly
- The hops come away easily from the bine

My First Gold hops were ready earlier than the Cascade by 2 weeks, which meant I left the Cascade crop on the bines for a bit longer and picked the First Gold first.
Last year I used the hops straight away. This year I didn't have time to brew straight away and use the hops to make a green hop beer. So i looked into ways of drying the hops at home. Many people opt for a net or screen set up by a sunny window, but by early October the sun isn't reliable like it is in early September so in order to keep the the hops from oxidising too much (which destroys the aromatics) I tried drying them in my oven. The temperature needs to be as low as possible to avoid oxidisation.

For me this was about 40C. I arranged half a kilo on three baking trays for 2-3 hours, stirring the hops every now and then to get an even result. After this time the hops were excellently dried. This removed 80 - 85% of the water (about right) and final weight was between 100g and 80g depending on the batch. I stuffed these into freezer bags, squeezed as much air out as possible and used a food seal clip to attempt to make airtight. Ideally i’d use a vacuum seal, but i don't have one and this would do if i use the hops quickly.
I made a beer with the Cascade hops that I’ll detail in the next post.
Saturday, 24 September 2016
English IPA #1
Why don't you see more IPAs that use English hops? Is it because the taste of the hops is different to American hops? Is it that they don't really suit the style? Certainly you do see more old fashioned English pale ales and traditional IPAs with English hops, but not so often in the American style IPAs.
I love hoppy beers, so I was inspired by BrewDog's recipe book DIY dog to have a go at an American style IPA using English hops just like they had done.
I went for a simple recipe with the focus intended to be on hop flavor and aroma. I used the most traditional English hops, Fuggles for flavour, and East Kent Goldings for aroma. My friend made a lovely fruity pale using East Kent Goldings,
Recipe (19 litres)
6kgs Maris Otter
45g Fuggles - 60mins
55g Fuggles - Whirlpool (80C)
180g East Kent Goldings - dry hop for 4 days
OG 1065
FG 1010 (7%)
Yeast: White Labs London Ale Yeast WLP013
Quite a nice beer - but not an IPA
So how did this work out? It's a decent beer. Without prompting my friends and family have liked the beer and thought it was a belgian beer. It has a nice Fuggles flavour, but its not got much aroma to speak of despite the huge dose of hops.
I took the beer to my local beer club for tasting - and they gave me some really useful feedback on the beer:
The good points
* decent beer - drinkable
* good colour and body
* good fuggles flavour
The bad
* Some off flavours (fermented too high temperature? Some yeast autolysis?)
* Very little aroma
* Not bitter enough
How could I have improved this beer?
So the main message is that some english hops are just not very suited to hoppy styles. One suggestion was to use Bramling Cross hops as these a much more American flavour.
The yeast off flavours were due to the temperature i fermented at. This is because i have no way to keep my fermenter cold, and at the time (early July 2016) it was regularly 30C during the day and pretty high 20s during the night. So i could have used a more temperature tolerant yeast like Danstar Nottingham, or a Belgian Saison yeast.
Some of the brewers thought that the yeast flavours may have masked the hop aroma - although i'm pretty sure this was down to the East Kent Goldings, as they didn't have much aroma when they were opened in the packet.
Friday, 9 September 2016
Holiday beers
However I picked out 3 beers that were made in France that I sampled over the holiday.
1. De Goudale - grand cru with Fantasia hop.

2. Abbey du mont Saint Eloi - Bier du Garde

3. Pietra - Biera Corsa.

Monday, 18 July 2016
Windsor and Eton brewery tour
 |
| 12 delicious beers on tap! |
 |
| Our tour guide, Will |
There were five breweries in the town in its hey day. The last of these closed in 1931, and there was no more brewing in the town until the new Windsor and Eton craft brewery opened 6 years ago. In that short time the brewery has expanded rapidly to an output of nearly 1.5 million pints of beer per year.
 |
| Lovely krausen on this beer |
We were taken around the brewery by Will, a partner in the business and a lifelong brewer. In contrast to the wooden vats and ancient timbers of the Wychwood brewery I visited back in March, the Windsor brewery is a temple of glistening stainless steel. Nine large fermenting vats contain a huge amount of delicious beer.
 |
| 9 large fermenters |
While Will tells us about the brewery and how they got started, we get stuck into the beers. Eventually we will sample 8 of the beers, quaffing about a third of a pint of each brought freshly from the bar.
 |
| Big bags of malt on the left |
Time for another beer Will says, and we tuck into some Guardsman, its a beautifully caramelly beer, with a big hop hit. Its like London Pride with the hops turned up to 11. Will explains that they designed the beer to be like London bride. It is a great example of what Windsor do - clean bright beers where the hops take centre stage With guardsman the centre stage hop is Fuggles, others feature American hops (Citra, Simcoe). In fact there's a big open bag of Simcoe that I'm sure we can smell all the way around the tour of the fermenters.
 |
| Mmmmm BIG bag of simcoe hops! |
 |
| underneath the fermenters |
Take a look under fermenter No6 says Will. The bucket under No6 looks like it is boiling, there is so much air passing though. They finish the main part of the fermenting in 4 day. This pretty much finishes the tour, two and a half hours in. 7 beers in we retire to the bar for the last beer. We have been too slow says Will, not enough time to drink the last beer on the tour. Oh, but we had so much fun, 2 1/2 half hours flew by.
Friday, 17 June 2016
Spent grain, salt free pizza base
 I often feel quite guilty about how much spent grain is left over after a brew. I don't throw the grain away, I compost it, but even so I'm often left thinking I could have done much more with the grain.
So, I had a go at adding some spent grain to pizza, and it worked really well. In fact I could hardly tell the grain was there except when the odd husk got stuck in my teeth. Over all it added nicely to the whole meal crust. Here's the recipe, it makes 3 thin pizzas. Caution, as I don't like to add salt the dough wont keep unless you freeze it quickly.

272g White flour
204g Wholemeal flour (I prefer spelt, but any wholemeal will do)
1 tablespoon sugar
2 tablespoons oil
355g Warm water
12g (1 packet) dried bakers yeast
100g spent grains (maris otter in the picture)
Set to the dough setting in a bread maker (or kneed yourself) - allow to rise and then roll out as preferred. Blind bake for 5-10 mins until starts to rise, then add toppings and finish.
Serve with some homebrew :)
Monday, 30 May 2016
Berliner weisse the quick way (to make your house smell of vomit)
All of a sudden the weather is getting warmer and summer is just around the corner. I'm now brewing for the summer. Crowd pleasing pale ales for camping trips and thirst quenching wheat beers for baking hot summer days.
This year I also wanted to have a try making a low abv wheat beer called "berliner wiesse." Its a sour wheat beer which can be tart and refreshing, perfect on a hot day.
The traditional beer is soured with the main fermentation - a lactic acid producing bacteria (lacto-bacillus) is added in with the brewers yeast and the beer slowly sours. A faster way of making the beer is to sour the mash first, then to boil the wort and ferment as normal. This has the added benefit of not adding lacto-bacillus into fermenters and tubing etc. where it can stay around and get into other beers (souring these unintentionally). Another benefit is that it means the beer can be hopped and dry hopped more than the traditional version, hops stop lacto-bacillus from acting.
 The method is pretty simple. Make a 1030-1035ish wort - i used 1.7kg of wheat malt in a BIAB mash. The mash went really well, it eventually came out at 1032 after the boil, colour was fantastic.
 The next part was new to me. Basically I got two handfuls of pale malt grain and popped these into a hopping bag, and throw them in. The raw grains house lacto-bacillus on them, and quickly a thin krausen formed on top (i did this in the stainless brew kettle so i could boil clean everything easily afterwards.) I left this to do its thing and get even smellier hoping that this would do the job souring.
So far so good. Everything to plan as I had read. But one thing i wasn't prepared for, which was the awful smell. The wort smelled of vomit. Like a street outside a pub early in the morning on Saturday after payday. But it was in my house, and horrified I knew the next step was to boil it. I couldn't quite get the boiler outside, I opened every window I could. The result was that my kitchen stank of vomit for 2 days. This got me in a lot of trouble with my wife, and so its probably the last time i can make this for a while without a different method.
I boiled the wort for 15 mins with 25g of English Archer hops, which have an Apricot fruity tinge. The plan is to dry hop with Amarillo for a nice fruity Aroma.
So far, a week into fermentation the vomit smell has dies back a lot, but its still there in the background - I hope this will go by the time this gets out of the bottle in a few weeks!
This year I also wanted to have a try making a low abv wheat beer called "berliner wiesse." Its a sour wheat beer which can be tart and refreshing, perfect on a hot day.
The traditional beer is soured with the main fermentation - a lactic acid producing bacteria (lacto-bacillus) is added in with the brewers yeast and the beer slowly sours. A faster way of making the beer is to sour the mash first, then to boil the wort and ferment as normal. This has the added benefit of not adding lacto-bacillus into fermenters and tubing etc. where it can stay around and get into other beers (souring these unintentionally). Another benefit is that it means the beer can be hopped and dry hopped more than the traditional version, hops stop lacto-bacillus from acting.
 The method is pretty simple. Make a 1030-1035ish wort - i used 1.7kg of wheat malt in a BIAB mash. The mash went really well, it eventually came out at 1032 after the boil, colour was fantastic.
 The next part was new to me. Basically I got two handfuls of pale malt grain and popped these into a hopping bag, and throw them in. The raw grains house lacto-bacillus on them, and quickly a thin krausen formed on top (i did this in the stainless brew kettle so i could boil clean everything easily afterwards.) I left this to do its thing and get even smellier hoping that this would do the job souring.
So far so good. Everything to plan as I had read. But one thing i wasn't prepared for, which was the awful smell. The wort smelled of vomit. Like a street outside a pub early in the morning on Saturday after payday. But it was in my house, and horrified I knew the next step was to boil it. I couldn't quite get the boiler outside, I opened every window I could. The result was that my kitchen stank of vomit for 2 days. This got me in a lot of trouble with my wife, and so its probably the last time i can make this for a while without a different method.
I boiled the wort for 15 mins with 25g of English Archer hops, which have an Apricot fruity tinge. The plan is to dry hop with Amarillo for a nice fruity Aroma.
So far, a week into fermentation the vomit smell has dies back a lot, but its still there in the background - I hope this will go by the time this gets out of the bottle in a few weeks!
Tuesday, 17 May 2016
Wychwood brewery tour
In February I took a tour around the Wychwood brewery in the Cotswolds. It's where both the Wychwood and Brakespear named beers are brewed.
The brewery itself is nestled in behind the small Cotswold town of Witney, Oxfordshire. The tour takes around 20 people around the whole brewery, giving an idea of how the beers are made and telling some of the history of the site.
 |
| Outside the brewery, waiting for the tour to begin |
 |
| Brakspear fermenting vats - the ones in the foreground are the secondary fermenters |
The history is all around, in particular the front door is a nice piece. Our guide had lots of anecdotes about the buildings, their history and the way the business has evolved over time.
 |
| Lovely old door on the brewery |
 |
| Our knowledgeable guide |
The main Wychwood fermenting vats are very different to the Brakspear ones, very modern stainless steel tanks - there were about twenty in all and each one utilised with a brew.
 |
| The main fermenting vats |
The brewing vessels themselves were massive. The copper "kettle" rose all the way from the floor to the ceiling. This brings a huge amount of liquid to the boil. Likewise the other brewing vessels are also much larger, the hop back and the whirlpool.
 |
| The copper - a huge vat! |
 |
| The silver vat I think is the hop back... |
 |
| Lovely period malt miller, they don't make them like this any more etc |
 |
| The whirlpool |
Having had a good look around the brewery, and getting a hang of how everything works we finally got led back to the taproom for a tasting session.
Here we got to try a wee bit of almost all the main range of Wychwood beers. Not much more than a pint per person but a good way to try a big range of beers. In particular I enjoyed the Arrowayne (3.6%) which is an excellent session-able mild.
Overall a great way to spend an afternoon. It's a well pitched tour, enough detail to satisfy, not so much beer nerdery that it's not accessible.
 |
| The tasting! YUM! |
Saturday, 13 February 2016
Yeast washing
 Fresh liquid yeast is great. I think it makes for better beer and certainly the beers i have made with liquid yeast have been better on the whole than those with dried yeasts. But there are some drawbacks.
1) liquid yeast is much more expensive than dried - at nearly £8 for a phial or smack pack.
2) the yeasts are imported from California - which means that they rack up a lot of air miles. This seems really disproportionate seeing as many of the yeasts I use are English, Belgian and Scottish - from about 250 miles of where I live. Brewlabs at Sunderland University has a limited number of UK yeasts available - but there is nothing in the EU that is anything like Whitelabs or Wyeast.
So for both cost and environmental reasons it makes sense to re-culture yeast. It's also a useful back up to have a store of dormant yeast in the fridge ready to go if your planned yeast fails.
I harvest yeast from the previous fermenter. there's always a layer at the end, a yeast "cake" that is left after the beer is racked off. I add some cooled boiled water to this and then pour off the sludge to some sanitised jam jars. Then once this has settled I pour the liquid from these into a smaller jar, leaving the solid trub.
I seal the jars tight and keep these in the fridge. These can be woken up before using to make the next beer by adding them to a sugar solution, or a wort.
In general I add 100g of sugar to 1000ml of water - then add the saved yeast. See the results below which are the two yeasts for my next brew. They were ready to go after 48hrs!


Friday, 12 February 2016
Crabapple sour beer
 |
| Not pink as i had been led to believe it would be |
But there are only a limited number of things you can do with them. You can't eat them - they are too sour. You can make them into a nice tart jam (it goes really well with roast chicken), i've made muffins with little chunks of apples in. Theses were ok. This year the harvest was amazing. Even after making a huge amount of jam.
This year there was a bumper harvest. I wondered if you could make a crabapple beer - and turns out you can! Even better it is supposed to come out a crazy pink colour! Mine didn't. The fermentation went fine, the secondary was as planned. But the colour wasn't pink.
The taste. Well, it's a bit sour. I used a fruity brett mix so it isn't too lambicky or challenging. It's a bit sour from the crab apples. But essentially it tastes like a mild cider. Crisp, refreshing, dry - but still very cidery!
11L BIAB
Yeast - Yeast Bay Dry Belgian Yeast
OG 1044 - est 3.8 abv before adding brettanomyces, 4% at finish of fermentation.
Yeast - Yeast Bay Dry Belgian Yeast
OG 1044 - est 3.8 abv before adding brettanomyces, 4% at finish of fermentation.
Grain
2.26kg Wheat Malt
2.26kg Wheat Malt
Hops
20 mins - 10g East Kent Goldings
20 mins - 10g East Kent Goldings
Additional
1.4 kg frozen crab apples added to secondary for 2 months (quartered).
Added 1 vial of "amalgamation " Yeast Bay Brett yeast
1.4 kg frozen crab apples added to secondary for 2 months (quartered).
Added 1 vial of "amalgamation " Yeast Bay Brett yeast
Tuesday, 9 February 2016
Cherry sour
My first stab at cherry sour happened by accident. I was planning to a crabapple beer. I had made a 4% Belgian golden ale as the base which I was going to add the fruit and souring yeasts to.
But when i took the crabapples out of the freezer they had kept very badly, browned all over looking very unpleasant. I couldn't commit to using these, so i composted them and instead bought some frozen cherries from the supermarket.
I split the beer into two batches. One would be exposed to a Brett mix which would mature in 2 months. The other I'd expose to a lambic bacteria mix (with pediococcus and lacto bacillus as well as Brett) which would be ready in .... 12 months.
I let the cherries defrost. I liquidized these in the food blender and then poured the cherry mixture into the containers. An elementary mistake, but cherries contain a lot more sugar than crab apples, so very soon both containers had begun to froth and then overflow.
Ooops. I scooped off the excess cherries and poured away some of the work (wah!) to prevent any further blow over. At least when adding your own wild yeast you don't need to worry any more about your beer getting infected. It's already infected!
First cherry beer will be ready about easter time, i'll get the first look at it at the end of February!- the lambic one will have to wait for Christmas.
But when i took the crabapples out of the freezer they had kept very badly, browned all over looking very unpleasant. I couldn't commit to using these, so i composted them and instead bought some frozen cherries from the supermarket.
I split the beer into two batches. One would be exposed to a Brett mix which would mature in 2 months. The other I'd expose to a lambic bacteria mix (with pediococcus and lacto bacillus as well as Brett) which would be ready in .... 12 months.
I let the cherries defrost. I liquidized these in the food blender and then poured the cherry mixture into the containers. An elementary mistake, but cherries contain a lot more sugar than crab apples, so very soon both containers had begun to froth and then overflow.
Ooops. I scooped off the excess cherries and poured away some of the work (wah!) to prevent any further blow over. At least when adding your own wild yeast you don't need to worry any more about your beer getting infected. It's already infected!
First cherry beer will be ready about easter time, i'll get the first look at it at the end of February!- the lambic one will have to wait for Christmas.
Sunday, 31 January 2016
Cantillon

During my last trip to Brussels I found myself with some time to kill so I took the short walk from Midi station to Brasserie Cantillon. This brewery in Brussels's Anderlecht district is famous for its lambic beers, fermented spontaneously with wild yeasts from the local air.
It's the first time I've made the trip. I didn't get a chance to take the tour (next time!) but i did have a nose around the entrance and the foyer, buying a few beers to take home in the process.
Blink and you'd miss the brewery entrance on a quiet, shabby street. The double yellow doors have a small notice on with opening hours. Step inside and the first thing to notice is the brewery smell. Slightly sour and stale. Promising and alluring.
A smart modern brewery tap is built between a functional office, and a smart seating area. On the other side a bottle shop and merchandise desk busy with tourists and a map showing all the distributors of the beers across the world.
I brought back 3 beers:
Organic Geuze
Kriek (cherry lambic)
Rose (Rasberry lambic)


At a later point in the future after my January abstinence is over I'm going to review these with a friend of mine who doesn't really know much about sour beers to gauge some reactions.....
Subscribe to:
Posts (Atom)